Intro
So as some of you guys may know, I now work for NCC Group as a Security Consultant doing web and infrastructure pentesting. This normally means that I don't tend to do very much security work outside of that. Lately however, I have gotten the oppertunity to do some more research, specifically with reverse engineering. One afternoon I wanted to do something interesting, and remembered about the idea of crackme's, or small programs that people create to be reverse engineered.Crackme's usually have some sort of goal in mind. For example, they may ask you to find a working serial for the program, or to remove an annoying popup that appears every time the program starts. Additionally they may have some restrictions on a proper solution. For example they may also state that you can't patch the program's assembly so that it jumps over the function that displays the nag screen and that instead you must find another way to solve the problem.
After looking around at a few crackme's I eventually found one that I thought would be a good, very easy challenge to start off with: LuCiFeR's Crackme #2. You can find the file at http://crackmes.de/users/lucifer/first_c_crackme/. Alternatively, you can download it here if you don't want to sign up for an account at crackmes.de: https://drive.google.com/file/d/0B5pT4hU_yYUWeXFvS2RLeDhoTWc/view
Tools Used
To solve this crackme, I originally used OllyDBG and BinaryNinja. That being said however, BinaryNinja is currently in beta and after testing it for a while I found I really don't like it's limitations, such as not being able to search for cross references to a string. Because of that, for this tutorial I will be using Hopper Disassembler. You can use the demo version or the paid version for this tutorial, though I will be using the paid version as I have a personal license. To download Hopper Disassembler, simply visit as well if you want, which is available from http://hopperapp.com/download.html.Keep in mind the demo version of the application has a 30 minute limitation on sessions and you cannot save your session. This is similar to the free version of IDA Pro with the exception that with IDA Pro's free version does not limit the session's length. If you don't want to pay the £70 for the full version of Hopper and you want longer sessions, but don't mind not being able to save your work, then you can also do this in IDA Pro's free version.
Initial Analysis
To begin our analysis of the crackme, lets first read what the readme.txt file contains:- Rules:
- 1. Do not Patch
- 2. Sniff a serial for your name
- 3. write a keygen
With that in mind, lets run the crackme and see what we have:

Okay so we have a few things to note here. The first thing is that the program displays a menu. We should note this down as we may want to look through the program's strings in a disassembler and see if we can find any cross references to these strings in memory. This will then allow us to determine the corresponding function that prints the program's menu, which will help us start to analyse the program's execution flow.
The other thing to note is that the program seems to be taking in a name and a serial as input. Based on the fact that the error message that is returned says that we have not entered the correct serial, it seems reasonable to make a guess that the program could be taking in the name as input into some sort of serial generation function. The serial that the user enters is then checked against the output from this function, and if the serials do not match, the program displays an error message and terminates.
Now that we have done an initial analysis of the program and it's functionality, lets load it up into Hopper and examine it. Drag the executable into Hopper and accept the defaults to load it as a Windows PE file. Once Hopper has finished it's analysis, you should see something like the following:

You may not be able to see it above, but Hopper has dumped us at the program's entry point, which it has helpfully denoted as the function EntryPoint. On the left we can see a whole bunch of functions, however none of them seem to have any helpful names.
There's a few ways to solve this issue, but the way I like to do it is by looking at the program's strings. To do this, click on the button on the upper left next to the Labels button labeled Strings:

Hey, would you look at that! There's several strings which appear to be from the program's menu. Lets see if we can find which function they are being used in. To do this, first double click on one of the strings that were printed within the menu. You should see something like the following:

If you look to the left here, you can see hopper has helpfully provided several XREFs for each of the strings to let us know where they are being used. As you can see in the screenshot above, it seems like function sub_4014e2 is using all of these strings. Lets see if we can't examine this further. To examine the cross references for a particular string, single click on the string from the listing shown above (any one will do :) ), and then hit the x button on your keyboard:

Ok, now in addition to the location of the cross reference, we can also see the specific instruction that references the particular string we chose to examine. To go to the corresponding function, simply hit the Go To button. This should give us the following:

Looking at the assembly, we can see there are several strings which appear to be loaded into the variables var_424 and var_428 before the function sub_431fe0 is called, presumably to print the string out to the screen. Lets rename these variables and the function to make it easier to read the disassembly.
For starters, lets rename sub_431fe0 to print_buffer_to_screen. To do this, click on the function sub_431fe0 within the disassembly, then hit the n button to rename the function:

If we look at sub_432880, we notice that it seems to be being called every time that the program expects input. We can assume that this function grabs the user's input and saves it to a buffer, so lets rename this function to grab_input_into_buffer. When we are done we should get something like the following:

The next thing we want to do is analyse what is being done with our input. To do this we need to focus on the calls to grab_input_into_buffer. Lets take a look at them:

What we can see here is that EAX appears to be loaded with the location of a variable in memory (this is done via the LEA instruction). In the first call, this is var_108, whilst in the second call this is var_208. This address is then placed into var_424, which appears to serve as a pointer to the buffer in memory where our input should be stored. Following this we see that for both calls, var_428 is passed the parameter 0x437510 prior to the call to grab_input_to_buffer. Combining this all together and using Hopper's helpful comments in green on the side, we can determine that var_428 is the first argument to grab_input_to_buffer, which contains the stream number to grab the user's input from. The second parameter is var_424, which contains a pointer to the buffer in memory where the user's input is to be stored. This allows grab_input_to_buffer to effectively grab the user's input and store it in memory.
Finally, if we look just after the second call to grab_input_to_buffer, we can see a call to j_strlen along with the parameter EAX, which appears to be loaded with the address of var_108, or the buffer where our name was stored earlier. Lets see what the program does once it has calculated the length of the name that we inputted into the program:

First, the program loads the result of the strlen call from EAX into EDX at 0x00401676. We then go ahead and multiply EDX by 0x875cd, storing the result in EDX (the first parameter to IMUL is where to store the result, the second one is what to multiply 0x875cd by :) ). Once that is done, we move 0x51eb851f to EAX, and then execute mul edx.
What is important to note at this point is that the mul instruction multiplies EAX by the parameter provided and stores the result in EDX:EAX. That is, the higher 32 bits of the result are stored in EDX, whilst the lower 32 bits of the result are stored in EAX.
With this in mind, the next instruction, MOV EAX, EDX stores the higher 32 bits of the result into EAX. The instruction SHR EAX, 0x5 then shifts EAX right 5, which is equivalent to dividing by 2 ^ 5, or 32.
Once this is done we multiply the result by 0xfffffc90 and store it in EAX. Keep in mind that any result over 32 bits will be dropped at this point. In other words if we end up getting a 42 bit number as the result of the multiplication, the first 10 bits would be dropped and only the last 32 bits would be saved in EAX.
Next we move 0x0 into EDX and push the values of EDX and EAX onto the stack. I do not know why this occurs as it does not impact anything and the values are not POP'd off the stack at any point.
Following this, the instructions at 0x00401697 to 0x004016aa do some instructions with floating point numbers. We'll get into this with OllyDBG in a bit but for now just now that there is a seperate stack which is used for floating point numbers and these instructions use that stack to adjust our calculated serial somewhat.
If we look at 0x004016ae to 0x004016bf we can see that we load the string "%i-x019871" into var_42C and the address of var_308 into var_430. These are then used as the first and second arguments respectively for the call to j_sprintf, which seems to save the serial that we should have entered into var_308.
Finally, we have a call to j_strcmp which compares two pointers to string buffers to see if their contents are the same or not. The first argument points to var_208, which holds the serial that we entered into the program. The second argument points to var_308, which holds the serial that we should have entered. The program then jumps to a goodboy or badboy message according to whether or not these two buffers matched or not.
Initial Overview of Crackme Algorithum
At this point we can determine the algorithum works as follows:- The program calculates the length of the user's name.
- This is then multiplied by 0x875cd.
- The result of this operation is then multiplied by 0x51eb851f and the higher 32 bits of the result are saved.
- Bit-shift this number right 5 bits, effectively dividing by 32.
- Multiply this value by 0xfffffc90
Using OllyDBG to Solve the Floating Point Instructions Issue
With a understanding of most of the crackme's algorithum, we now turn to OllyDBG to understand the floating point instructions and how they change the final serial that is generated.To speed things up a bit, first set a breakpoint at the address 0x00401623, which is hit after the first part of the menu is printed out. If we scroll down we should see the same disassembly as in Hopper, with the first floating point instruction occuring at 0x00401697 after the PUSH EDX and PUSH EAX instructions. Let's put a breakpoint here so we can examine things further, and press F9 to continue the program. We enter in our name, and our serial, pressing F9 to continue the program as needed before eventually we hit the breakpoint:

The next instruction, FILD QWORD PTR SS:[ESP] loads a QWORD, or a 64 bit number, from the location pointed at by ESP, and puts it onto the FPU (Floating Point Unit) stack. This can be seen in the following screenshot. Notice that ESP holds the value 0xFE8BC1A0 while ESP+4 holds the value 0x00000000. As we are reading a 64 bit value into the FPU stack, we read both of these values (a 32 bit, or DWORD read would just read the value at ESP, 16 bit, or WORD read, the SP register, etc etc):

An important point to note here is that the value 0xFE8BC1A0 is the value calculated from the first 5 steps of the algorithum that we have examined so far. Moving on though, we can see that the MM7 register of the FPU stack has now been changed to hold the value 0x000000000FE8BC1A.
The next instruction, LEA ESP, [ESP+8] loads the address of ESP+8, which holds the name that I entered into the program (in this case "Grant"), into ESP. This effectively moves the stack pointer so that it now points at our name on the stack.
The instruction FSTP QWORD PTR SS:[LOCAL.260] pops the QWORD value 0x000000000FE8BC1A off of the FPU stack and writes it to the local variable LOCAL.260. If we look closer at the information provided by OllyDBG, we can see that LOCAL.260 is the address 0x0063FB30. Following this in the dump (right click on the address in the information display and click Follow in Dump) shows that the memory is currently empty:
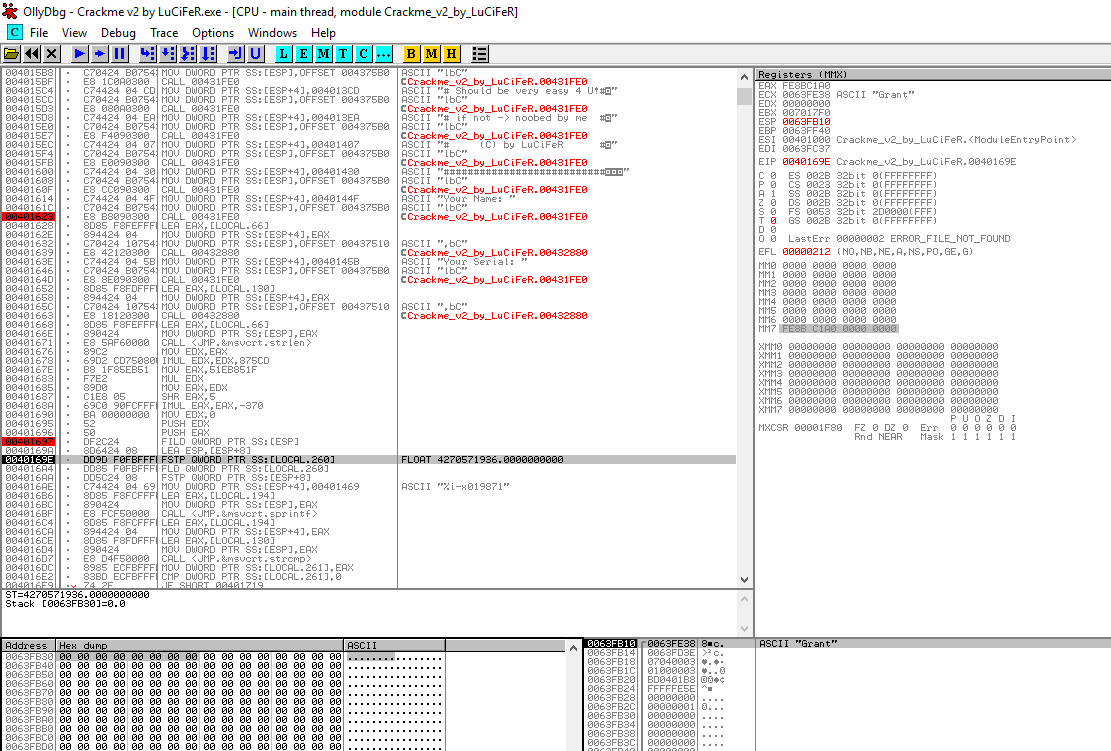
We can also see that OllyDBG tells us that the float value 4270571936.0000000000 will be written into memory at this address. Pressing F7 to do a single step in OllyDBG, we can see that the memory has been adjusted, though not quite in the way we expected:

Whats happened here? Well, this took me a bit of research and I had to look at some previous answers to understand what happened here, but apparently the FSTP instruction, when converting the number 0x000000000FE8BC1A to floating point number, or 4270571936.0, also packed the number into binary format before storing it in memory. Reversing the bytes, this means that the number is now stored as 0x41EFD17834000000 at 0x0063FB30 in memory.
The next two instructions FLD QWORD PTR SS:[LOCAL.260] and FSTP QWORD PTR SS:[ESP+8] first load the value of LOCAL.260, which is now 0x41EFD17834000000, onto the FPU stack, and then POP that value off of the FPU stack and write it to ESP+8.
MOV DWORD PTR SS:[ESP+4],00401469 moves the string "%i-x019871" into ESP+4, and the following two instructions LEA EAX,[LOCAL.194] and MOV DWORD PTR SS:[ESP],EAX load the address of LOCAL.194 into EAX and push it as the first argument. We then see a call to sprintf with these three parameters. From this we can conclude that we are sprinting the resulting serial into memory at LOCAL.194, and that the string "%i-x019871" is the format string to print into memory, whilst LOCAL.260 is the value that will replace the "%i" part of the format string before it is placed into memory.
Final Crackme Algorithum
From this, we now have our crackme algorithum. We also know that the generated number is appended with the string "-x019871". Our new algorithum now looks as follows:- Calculates the length of the user's name.
- Multiply this number by 0x875cd.
- Take the result of this operation, multiply it by 0x51eb851f and take the higher 32 bits of the result.
- Bit-shift this number right 5 bits, effectively dividing by 32.
- Multiply the resulting value by 0xfffffc90, and store only the lower 32 bits as the result.
- Take this value in hex and convert it to a floating point decimal number, then pack the result in binary format.
- Convert the number back to an integer, and append the string "-x019871" to it.
The Keygen
The last part of the challenge asked one to generate a keygen for the program. This is a small program which takes the algorithum mentioned above and generates a serial based on the name entered. I will leave this as an exercise for you to complete, however if you would like to see my poorly annotated, hacky solution, you can find it here: https://drive.google.com/file/d/0B5pT4hU_yYUWMnBfVTllaHNrMWc/view?usp=sharingConclusion
I hope you enjoyed this tutorial and it inspired you to get into crackmes more :) I appologise if it was overly detailed in places but I wanted to make as many people could follow along as possible. Let me know if you have any comments or feedback!-tekwizz123